Difference between revisions of "ADS-WS1"
(→Main Unit) |
Ian ZL1VFO (Talk | contribs) m |
||
| Line 7: | Line 7: | ||
[http://www.argentdata.com/files/english.bin Voice Data] | [http://www.argentdata.com/files/english.bin Voice Data] | ||
| − | [http://www.argentdata.com/support/firmware/WS1/ws1- | + | [http://www.argentdata.com/support/firmware/WS1/ws1-57772.s19 Latest firmware for offline use](As of 2017-01-19) |
[http://www.argentdata.com/files/ws1-defaults.cfg Saved configuration for offline testing] | [http://www.argentdata.com/files/ws1-defaults.cfg Saved configuration for offline testing] | ||
Latest revision as of 03:53, 20 January 2017
The ADS-WS1 is a low-cost weather station with direct APRS support (no external TNC required), serial data output (for connection to a PC or TNC), and voice synthesis capability.
Firmware for the WS1 is still in beta testing. Information provided here is preliminary and subject to change.
Latest firmware for offline use(As of 2017-01-19)
Saved configuration for offline testing
Voice samples have been uploaded as of 5/4/2010. Most beta test units shipped without voice data loaded - voice.bin will need to be loaded through WxConfig for the voice function to work.
Contents
Main Unit
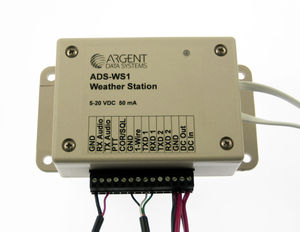
The main unit is housed in a flange mount enclosure with a removable 14-position 0.15" pitch terminal block, a 0.5" port (covered with stainless steel mesh) for sensor ventilation, and notches to accommodate the wind and rain sensor cables, connected internally. To open the main unit's lid and install the wind and rain cables or set DIP switch settings, unscrew the four screws on the top of the housing.
Temperature, humidity, and barometric pressure sensors are contained within the main unit.
Terminal Block Connections
| Pin | Function |
|---|---|
| 1 | Ground |
| 2 | Receive audio (from radio) |
| 3 | Transmit audio (to radio) |
| 4 | Push to Talk output |
| 5 | COR / Squelch signal from radio |
| 6 | Ground |
| 7 | 1-Wire data bus |
| 8 | Serial port 1 TX |
| 9 | Serial port 1 RX |
| 10 | Serial port 2 TX |
| 11 | Serial port 2 RX |
| 12 | Ground |
| 13 | DC Out (radio power control, 5A max) |
| 14 | DC In (5 to 20 VDC, 50 mA) |
DIP Switches
| Switch | Function |
|---|---|
| 1 | ON = Increase audio output level |
| 2 | ON = Increase audio output level |
| 3 | ON = Enable COR pull-up |
| 4 | ON = HT push-to-talk mode (for most handhelds except Kenwoods) |
Serial Output
Currently port 1 outputs serial data at 2400 baud in Peet Bros data logger format. Complete record format is available, but only by sending a >H to the unit.
Weather Display (http://www.weather-display.com/index.php) will work with the WS1.
Weather Display Lite free version will also work with WS1 - use Peet Ultimeter as weather station type.
Connect with terminal program to serial port at 2400 Baud
Control C is command prompt
Control B gives the weather data
Type control C to get command prompt
Type " display " for parameters
ABAUD 4800
ALTITUDE OFF
AMODE AUTO
AUTHLIST
BBAUD 4800
BMODE AUTO
COMMENT Argent Data WS1 build 56216
COMPRESS OFF
HBAUD 1200
INTERVAL 300
LVINHIBIT 0
MYCALL WT9M-8
POSITION 4333.54N 09038.74W
POWER ON
PATH WIDE2-2
QUIET 16
STATUS 1
TEMP ON
TEMPADJ 0
TIMESTAMP OFF
TXDELAY 30
TXLEVEL 155
VOLTAGE ON
Control C for cmd:
then type Control B for below info
2013/05/06 10:45:50
Wind 090 degrees at 002 MPH gusting to 081 MPH
Outdoor temperature 000 F
Indoor temperature 080 F
Indoor humidity 039%
Outdoor humidity 000%
Barometric pressure 10189
Larry WT9M
Connections for computer programming cable
Computer cable
You need a "real" RS-232 cable. TTL level will not work.
First numbers are from WS1 to DB9 female plug
Pin 6 ground to pin 5 on DB9
Pin 8 serial 1 TX to pin 2
Pin 9 serial 1 RX to pin 3
--Wt9m 15:01, 20 September 2010 (UTC)
Radio Interfacing
This section is a stub. See the OpenTracker+ manual for a description of the radio interface signals and jumper settings.
For making an adapter to fit Opentracker radio cables
All these begin with ADS-WS1 pin number then to DB9 female pin number
Radio adapter
Pin 1 ground to pin 6 on DB9
pin 2 RX to pin 5
pin 3 TX to pin 1
pin 4 PTT to pin 3
--Wt9m 14:57, 20 September 2010 (UTC)
Status LED
The LED blinks once every two seconds to indicate normal operation. A green blink means the real-time clock is set, and a red blink means it's not. The LED will light solid red when transmitting.
Real-Time Clock
The WS1's internal clock is set when the configuration program exits. Early board revisions did not have provisions for backup power, so if power is lost the clock resets.
Boards equipped with battery connector J3 can be connected to a 3.6v lithium battery to provide backup power to the clock.
Wind and Rain Sensors
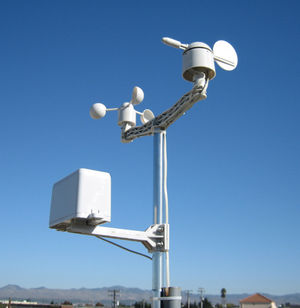
The wind and rain sensor assembly includes a 2-piece steel mast, cup anemometer, wind vane, rain gauge (0.011" resolution), cables, mounting arms, screws, cable ties, and clamps.
Installation
Avoid overhead power lines. Ensure the mast is properly grounded, and don't install the assembly on a chimney where it might be exposed to smoke and hot gasses.
When aligning the wind vane/anemometer, the 'boom' runs in an east/west direction with the anemometer on the west.
Radiation Shield Construction
The ADS-WS1 base unit must be installed in a sheltered location. If no suitable location is available, you can build an enclosure to protect the electronics from rain and direct sun while still allowing the temperature and relative humidity sensors to work properly. Some links to do-it-yourself Stevenson screen and Gill shield projects are included below.
Bird house style Stevenson screen
Stevenson screen made from plastic bowls
Fan-aspirated housing made from PVC pipe
N5ZTW's PVC Sensor Grenade (Word document)
Fan-aspirated Stevenson screen
Fan-aspirated Stevenson screen from flower pot trays
Another flower pot tray shield
Yet another flower pot tray shield
And some scholarly discussion of the subject:
Low-cost Shielding to Minimize Radiation Errors of Temperature Sensors in the Field
Help / Support Group
There is a discussion group ADS-WS1 Group On Yahoo Groups.
If you are having trouble you can ask question and read through what others are doing.
Datasheets and other interesting documentation are also with the Yahoo group.
Linux Weather Display (bash script)
The weather.sh Bash script
weather.sh was developed as a quick and simple way to view the data from the Argent Data Systems ADS-WS1 Weather Instruments. The objective was to NOT have to purchase a physical Display unit nor have to pay for any fancy software for Linux or Windows. This software provides nearly instant satisfaction that your weather instruments are working -AND- it can be used as your weather display just as it is! Leave it running in an Xterm, buried in a corner of your screen, or leave it minimized and pull it up when you wish to see the weather. Very simple!
This script is designed to be run as 'root' so it can grab the serial port without first modifying its permissions. It *can* be run as a 'user' if the /dev/tty device permissions are changed (see the code for instructions to do this). The script receives the 2400 baud serial data stream coming from the ADS-WS1 device, parses the respective fields, and displays them on the screen. The screen is TEXT based and requires NO additional software packages to be loaded or configured! Just open up a terminal window (xterm) and type "./weather.sh" and it runs! The screen will update once every 5 seconds (configurable). It's just that simple :)
When first started, several fields in the display are filled with zeros and will be replaced with real values as the script runs over the course of the first day. Each night at 1 minute before midnight, some statistics (Hi/Lo temps, Peak wind, Daily and Long-term rainfall) are written out to a log file (weather.log).
See http://server1.nuge.com/~weather for further information, and to download the Bash shell script.
Completely FREE and licensed under the GPL. So if you modify it, *please* contribute your work back to us for possible inclusion in future releases.
Arduino Notes
You will need a level converter to bring the RS-232 to TTL levels. You will probably need a 10k resistor from the RXD1 terminal to your supply voltage.
The resistor must be disconnected when using the config application.
Online Demos
N1VG-14 in Santa Maria, CA
Solar-powered station on the roof of the Argent Data Systems office.


