OpenTracker USB
Contents
[hide]OpenTracker USB
OpenTracker USB User's Manual (pdf)
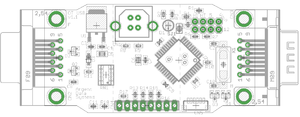
Despite the name, the OpenTracker USB is more closely related to the Tracker2 than the OpenTracker and OpenTracker+. It includes nearly all Tracker2 features with the exception of digipeater and Garmin protocol functions. It shares the same form factor as the OpenTracker+, with the addition of a USB type B connector on the front of the case.
USB Operation
The USB port on the OTUSB can be used for configuring the tracker with the otwincfg utility, accessing the command prompt, and connecting to a PC in KISS interface mode.
When the USB connection is in use, the tracker draws its power from the host system - no other connections are required for configuration of the unit.
Note that the OTUSB does NOT act as a host device - the USB port is only used for connecting to a PC, and cannot be used to connect a USB GPS receiver.
Windows
Windows 2000, XP, Vista, and 7 require the INF file linked here to properly recognize the device.
For help on installing the INF driver for the device, please see the Windows INF File Installation article.
Linux
Most Linux distributions should recognize the OTUSB automatically and assign it a name like /dev/ttyACM0. If the device isn't recognized, try the following:
sudo modprobe usbserial vendor=0x134a product=0x9000
The OTUSB can be told to exit KISS mode and return to command mode with the following:
echo -ne '\xC0\xFF\xC0' > /dev/ttyACM0
Replace ttyACM0 with the actual port being used by your OTUSB.
Running otwincfg.exe under Wine
The configuration utility can be used on linux using the Wine suite and winetricks. The following instructions were written for Ubuntu 11.10, but should be easily adapted to the distribution of your choice.
1. Plug the device in using USB and determine if the system sees it
$ sudo lsusb
Bus 001 Device 001: ID 1d6b:0002 Linux Foundation 2.0 root hub
Bus 003 Device 017: ID 134a:9000
The device should be listed with ID 134a:9000
2. Determine that it was mounted
$ ls /dev/ttyA*
/dev/ttyACM0
OTUSB should be mounted at /dev/ttyACM(n) - usually 0
3. Create a symlink for wine to access the device and allow it to write to it.
$ sudo ln -s /dev/ttyACM0 ~/.wine/dosdevices/com1
$ sudo chmod 777 /dev/ttyACM0
4. Execute the configuration utility with Wine
$ wine otwincfg.exe
Select COM1 as the the port.
If the program fails to execute, make sure you have mfc42.dll installed in your wine directory. This can be easily done using the winetricks in the Install Windows DLL window.
Mac OS X
OS X should recognize the OTUSB and assign a name starting with /dev/cu.usbmodem. If prompted to set up a dial-up device, hit cancel.
Other Operating Systems
The OTUSB is a USB CDC ACM serial device with VID 0x134A and PID 0x9000. Most modern operating systems should include class drivers for this type of device.
Configuration
The tracker should always respond to the otwincfg utility, regardless of the operating mode. If otwincfg is already running when the tracker is connected, it should automatically detect and connect to the device. If the operating system assigns a COM port number higher than 16, you'll need to change it manually in the device manager.
A single setting controls the USB port mode. This setting appears as the 'USB KISS' checkbox in the port setup box in otwincfg, and as the command USBKISS from the command prompt. Setting USBKISS ON or checking the checkbox will set the port to KISS mode, for use with host programs like AGWPE and UI-View32. If the host program sends a KISS exit command, this option will be disabled and the USB port will return to command prompt mode.
You can access the command prompt through the USB port exactly like you would through the serial port, using the terminal program of your choice. Note that baud rate settings are ignored on the USB port.
When the tracker is connected to a PC using the USB port and the USBKISS option is off, the command prompt will be accessible only through the USB port and not through port A as usual.

